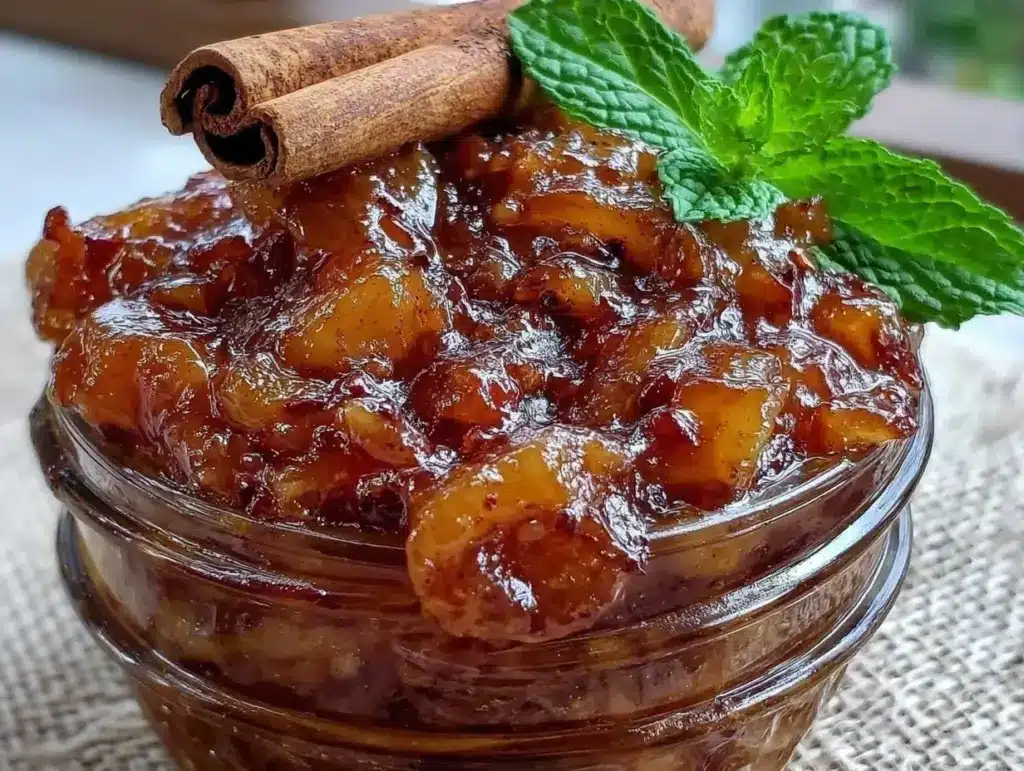
I found myself standing in the produce aisle of my local grocery store at 8:45 PM on a Tuesday, staring at a pyramid of Honeycrisp apples. They were marked down to $1.29 a pound, but I only needed one. Maybe two. The problem is, I live alone. If I bought a bag of apples for a pie, I’d have a mountain of leftover fruit rotting in my crisper drawer before I could even think about baking. That’s the reality of cooking for one—especially when you’re trying to keep dessert from blowing the grocery budget.
That Tuesday night, I did what any budget-conscious cook would do: I bought two apples, a can of apple pie filling (the cheap kind, not the fancy stuff), and a box of crescent rolls. I sat on my kitchen floor and ate it straight from the skillet with a spoon. It was warm, sweet, and tasted like autumn, despite it being mid-October in the middle of nowhere. That was the moment I realized I didn’t need to bake a whole pie to get that cozy, sugary comfort. I just needed a smarter way to handle the filling.
Most recipes for small batch canned apple pie filling are written for families of six or eight. They call for gallons of fruit, pounds of sugar, and pots that take up half the stove. But for a single person—or even a couple trying to stretch their dollars—those recipes are wasteful. You end up with three cups of leftover filling that you’ll either throw away or spend the next week trying to force into yogurt or oatmeal.
This recipe is different. It’s designed for a 15-ounce can of pie filling, which is the standard size at most grocery stores, but scaled down to make exactly one or two servings. It’s about taking a cheap, shelf-stable staple and elevating it with real spices and a tiny bit of fresh fruit so it doesn’t taste like syrup. It’s practical, it’s cheap, and it fits into a brown sugar cinnamon baked oatmeal or a quick soft no-knead artisan bread toast. It’s the kind of budget dessert that feels indulgent without the guilt of spending $8 on a slice from a bakery.
Why You’ll Love This Small Batch Apple Filling
There’s a specific kind of satisfaction in making a dessert that costs less than a dollar per serving. It’s not just about the money, though. It’s about flexibility. This small batch canned apple pie filling is your secret weapon for lazy nights, unexpected guests, or when you just need a sweet fix without the commitment of baking.
- Zero Waste, Maximum Flavor — The biggest win here is using a standard 15oz can but only cooking what you need. You aren’t left with a giant jar of sticky fruit in the fridge that turns brown by Thursday. You make exactly one or two servings, eat it, and the rest stays fresh in the can for later. It’s efficient.
- Pantry Staples Only — You probably have half these ingredients already. Canned apple pie filling is a budget hero because it’s shelf-stable. You add butter, cinnamon, and maybe a splash of lemon juice. That’s it. No trip to the store for exotic spices or fresh fruit that spoils in three days.
- Ready in 10 Minutes — This isn’t a 45-minute baking project. It’s a 10-minute stovetop warm-up. If you’re craving something sweet after dinner and you’re tired, this is the answer. It’s faster than ordering delivery and costs pennies.
- Multi-Use Magic — This isn’t just for eating with a spoon. It’s a base. I’ve used this exact mixture as a topping for creamy coleslaw (yes, really, for a sweet-savory twist), mixed into loaded bacon cheddar twice baked potatoes for a sweet potato alternative, or dolloped onto fluffy lemon ricotta pancakes for breakfast. It’s versatile.
- Budget-Friendly — A can of apple pie filling costs around $1.50. With butter and spices, your total cost is under $2.00. That’s less than a candy bar. For that price, you get a warm, spiced dessert that feels homemade.
This is my go-to when I need dessert to just work. No complicated techniques, no weird ingredients, just reliable, delicious food that makes everyone happy. And since it’s small batch, it doesn’t leave me with leftovers I don’t want.
Ingredients You’ll Need
Here’s the best part: you probably have most of this already. I’m particular about three ingredients here, and I’ll tell you exactly why. This small batch canned apple pie filling relies on quality control in small doses.
For the Base
Canned apple pie filling (15 oz / 425g) — This is your foundation. I recommend the brand with real apple chunks, not just slices. The chunks give you texture. Look for one that lists “apples” as the first ingredient, not high fructose corn syrup, if you can find it. But honestly, any standard brand works. I usually buy the store brand to save money. If you want to control the sugar, you can use unsweetened applesauce mixed with a teaspoon of sugar, but the canned filling is faster and has that classic “pie” flavor.
Unsalted butter (2 tablespoons / 30g) — This adds richness and helps the spices bloom. Don’t use margarine. I know we’re on a budget, but butter makes a huge difference in taste. If you’re out, vegetable oil works, but the flavor won’t be as deep. I keep a small stick in the fridge specifically for these kinds of quick sauces.
Ground cinnamon (1 teaspoon) — The star of the show. Use real cinnamon, not the “cinnamon flavoring” powder. It tastes dusty and fake. Ground cinnamon from a jar is fine, but if you have a whole stick, toast it and grind it. Freshly ground is best, but I’m being practical here—jarred is totally acceptable for this recipe.
For the Flavor Boost

Lemon juice (1 teaspoon / 5ml) — This is the secret weapon. Canned fruit can taste flat or overly sweet. A splash of acid brightens it up and makes the apple flavor pop. It’s a tiny amount, so don’t skip it. It balances the sugar.
Vanilla extract (½ teaspoon) — Just a hint. It adds warmth and depth. If you don’t have vanilla, skip it. But if you do, it makes the filling taste more like a dessert and less like a side dish.
Pinch of salt — I know it’s sweet, but salt enhances sweetness. It’s a basic cooking principle. Don’t skip it. It prevents the dessert from tasting one-dimensional.
Optional Add-ins
Chopped walnuts or pecans (2 tablespoons) — For crunch. I love the texture contrast. Toast them in the pan with the butter for extra flavor. If you’re allergic or just don’t like nuts, skip it. The filling is fine without them.
Grated fresh apple (½ cup) — If you have a fresh apple lying around that’s about to go bad, grate it into the filling. It adds freshness and cuts the “canned” taste. This is my favorite trick to make budget ingredients taste premium.
Equipment Needed
You don’t need fancy equipment for this. Here’s what I actually use.
Small saucepan or skillet — A 8-inch skillet or a small 1.5-quart saucepan works best. You want something narrow so the filling heats evenly. I use a small non-stick skillet because cleanup is easier. If you’re making a double batch, use a larger pan.
Wooden spoon or silicone spatula — For stirring. You need something that can scrape the bottom of the pan to prevent burning. Metal works, but wood is gentler on non-stick surfaces.
Measuring spoons — Pretty standard stuff. Dollar store versions work fine. You only need a teaspoon and a tablespoon.
Microplane or box grater — Optional, but nice if you’re adding fresh apple. Or just chop it finely with a knife.
Measuring cup — For the lemon juice. Or just eyeball it if you’re feeling lazy. It’s only a teaspoon.
How to Make It: Step-by-Step
Alright, let’s make this! I’m walking you through exactly how I do it, including the little tricks I’ve picked up.
Step 1: Prep Your Ingredients (1 minute)
Before you start cooking, measure out your cinnamon, vanilla, and lemon juice. Open the can of apple pie filling. If you’re adding fresh apple, grate it now. I know it seems fussy, but it makes the actual cooking way less stressful. Once you start cooking, things move fast.
Step 2: Melt the Butter (2 minutes)
Place your small saucepan or skillet over medium heat. Add the butter. Let it melt and foam slightly. Don’t let it brown. You just want it liquid and fragrant. If the butter burns, your whole dessert tastes bitter. I learned this the hard way with a batch of loaded veggie breakfast quiche where I burned the butter for the crust. Don’t make that mistake here.
Step 3: Add the Filling (3 minutes)
Pour in the canned apple pie filling. Stir it into the butter until well combined. The mixture will look thick and glossy. Let it heat through for about 2 minutes, stirring occasionally. You want the filling to get hot, but not boil. Boiling can make the apples mushy and the sugar too syrupy.
Step 4: Season and Finish (2 minutes)
Remove the pan from heat. Stir in the cinnamon, vanilla, lemon juice, and salt. If you’re adding fresh grated apple, stir it in now. The residual heat will warm it through without cooking it further. Taste it. Does it need more cinnamon? More lemon? Adjust to your liking.
Step 5: Serve
Serve immediately. It’s best warm. I usually spoon it over a slice of toast, a dollop of ice cream, or just eat it straight from the pan with a spoon. It’s that good.
Total Time: About 10 minutes (2 minutes active, 8 minutes mostly hands-off)
Built-in Troubleshooting
- Filling too thick? Add a splash of water or apple juice. It’s thick because of the cornstarch in the can. A little liquid helps it loosen up.
- Filling too sweet? Add more lemon juice. It cuts the sweetness. You can also add a pinch of salt.
- Filling too thin? Let it simmer for an extra minute or two. The cornstarch will thicken it as it cools.
Expert Tips & Tricks
Here’s everything I’ve learned from making this dozens of times. These tips will save you from my mistakes.
Toast the Cinnamon
If you have time, toast the cinnamon in the dry pan for 30 seconds before adding the butter. It releases the oils and makes the flavor much stronger. It’s a small step that makes a big difference.
Use Cold Butter
Actually, no. Use room temperature butter if you can. It melts faster and incorporates evenly. But if you’re in a rush, straight from the fridge works too. Just keep the heat low.
Don’t Over-Stir
Once the filling is hot, don’t stir it constantly. Let it sit for a minute to let the flavors meld. Constant stirring can break down the apple chunks and make it mushy.
Storage Hack
If you make a double batch (using a 30oz can), store the leftover filling in an airtight container in the fridge for up to 5 days. It reheats beautifully. I often use it as a filling for strawberry cream cheese stuffed croissants or as a topping for crispy Belgian waffles.
Variations & Substitutions
Once you’ve nailed the basic version, here’s how you can mix it up. I’ve tried all of these.
Cinnamon Roll Style
Add 1 tablespoon of brown sugar and a pinch of nutmeg. It tastes like the inside of a cinnamon roll. Perfect with sourdough French toast.
Spiced Pear Version
Swap the apple pie filling for pear pie filling. Add a pinch of cardamom. It’s a nice change of pace, especially in winter.
Apple Crisp Topping
Add 2 tablespoons of rolled oats and 1 tablespoon of brown sugar to the filling before heating. It creates a crumbly topping. Great over ice cream.
Gluten-Free
Check your canned filling label. Most are naturally gluten-free, but some brands use wheat-based thickeners. Look for cornstarch or tapioca starch. This small batch canned apple pie filling is easily GF if you choose the right can.
Vegan
Use vegan butter instead of dairy butter. The rest of the ingredients are naturally vegan. Check the filling label to ensure no dairy additives.
Serving & Storage
How to Serve:
I usually serve this straight from the skillet at the dinner table—it looks rustic and stays warm. But here are other ways I’ve enjoyed it:
- Over Ice Cream — Vanilla bean ice cream is classic. The warm filling contrasts with the cold ice cream.
- On Toast — Thick-cut sourdough or whole wheat toast. Top with a slice of cream cheese.
- With Yogurt — Greek yogurt with a drizzle of honey. It’s a healthy-ish breakfast option.
- Inside Pastries — Use it as a filling for gooey baked cinnamon roll French toast or turnovers.
Storage Instructions:
Store in an airtight container in the fridge for up to 5 days. The filling will thicken in the fridge—totally normal. Reheat gently in the microwave or on the stove with a splash of water.
Freezing:
This doesn’t freeze well. The texture of the canned filling changes when thawed. It can become watery or grainy. Make it fresh or store in the fridge.
Nutrition Information
I’m not a nutritionist, but here’s the breakdown if you’re tracking.
Per Serving (based on 2 servings):
- Calories: 220
- Protein: 1g
- Carbs: 48g
- Fiber: 2g
- Sugar: 38g
- Fat: 6g
- Saturated Fat: 4g
- Cholesterol: 15mg
- Sodium: 50mg
What’s Good:
– Low in protein (it’s a dessert, after all)
– No artificial colors if you choose a clean brand
– Can be made vegan or GF
What to Know:
– Higher in sugar from the canned filling
– Contains dairy (unless vegan butter is used)
– Moderate calories, but portion control is key
My Take:
Look, this is a budget dessert. It’s sweet and comforting. It’s not a health food. But it’s way better than buying a pre-made pie slice, costs less, and I know exactly what’s in it. When I want to make it lighter, I use unsweetened applesauce and add fresh fruit. But usually? I just eat a reasonable portion and enjoy it.
Final Thoughts
So that’s my go-to small batch canned apple pie filling! I’ve probably talked your ear off at this point, but when you make a recipe this often, you have a lot to say about it.
This has saved my dessert budget more times than I can count. It’s my answer to “what’s for dessert” when I’m tired, don’t want takeout, and still want something that tastes really good. I’m happy because I’m not stressed about cooking, and I didn’t spend $10 on ingredients for one bite.
Make it yours! Try different add-ins, swap in your favorite spices, or use it in unexpected ways. The best recipes are the ones you adapt to your life. If you make this, drop a comment and let me know what you think! I love hearing how recipes turn out in your kitchen.
Happy cooking! And I hope your kitchen smells half as good as mine does right now.
Frequently Asked Questions
Q: Can I use fresh apples instead of canned filling?
A: You can, but the cooking time and method change. For fresh apples, you’d need to peel, core, and chop them, then simmer with sugar and water for 15-20 minutes until tender. The canned filling is faster and has a consistent texture. If you use fresh, add ½ cup water and 2 tablespoons sugar to the pan.
Q: Why did my filling turn out watery?
A: Canned pie filling uses cornstarch as a thickener. If you didn’t heat it long enough, the cornstarch didn’t activate. Let it simmer for an extra 2-3 minutes. If it’s still watery, add a teaspoon of cornstarch mixed with water and cook until thickened.
Q: Can I make this ahead for a dinner party?
A: Yes! Make the filling up to 2 days ahead and store in the fridge. Reheat gently before serving. It actually tastes better after the flavors have had time to meld. Just add a splash of water when reheating to loosen it up.
Q: Is canned apple pie filling healthy?
A: It’s not a health food. It’s high in sugar and low in fiber. However, it’s better than buying a pre-made pie with a buttery crust and whipped cream. If you’re watching sugar, use unsweetened applesauce and add your own sweetener.
Q: Can I freeze this filling?
A: I don’t recommend it. The texture of the canned filling changes when frozen and thawed. It can become grainy or separate. It’s best made fresh or stored in the fridge for up to 5 days.
Q: How do I reheat leftovers without it getting dry?
A: Add a splash of water or apple juice to the pan and heat gently over low heat, stirring frequently. The extra liquid brings back the creamy texture. Microwave also works—heat in 30-second intervals, stirring between.
Q: Can I double this recipe?
A: Absolutely! Double everything and use a larger skillet. The cooking times stay the same. I do this when I’m meal-prepping or feeding a crowd. Just make sure your pan is big enough for the filling.
Pin This Recipe!


Small Batch Canned Apple Pie Filling
- Total Time: 10 minutes
- Yield: 2 servings 1x
Description
A quick, budget-friendly dessert made with a single can of apple pie filling, butter, and spices. Ready in 10 minutes, this small batch recipe is perfect for individuals or couples looking for a sweet treat without the waste.
Ingredients
- 15 oz can apple pie filling (preferably with real apple chunks)
- 2 tablespoons unsalted butter
- 1 teaspoon ground cinnamon
- 1 teaspoon lemon juice
- 1/2 teaspoon vanilla extract
- Pinch of salt
- Optional: 2 tablespoons chopped walnuts or pecans
- Optional: 1/2 cup grated fresh apple
Instructions
- Measure out cinnamon, vanilla, and lemon juice. Open the can of apple pie filling. If using fresh apple, grate it now.
- Place a small saucepan or 8-inch skillet over medium heat. Add butter and let it melt and foam slightly without browning.
- Pour in the canned apple pie filling and stir into the butter until well combined.
- Let the mixture heat through for about 2 minutes, stirring occasionally, until hot but not boiling.
- Remove the pan from heat. Stir in cinnamon, vanilla, lemon juice, and salt. If adding fresh grated apple or nuts, stir them in now.
- Taste and adjust seasoning if needed. Serve immediately while warm.
Notes
If the filling is too thick, add a splash of water or apple juice. If too sweet, add more lemon juice. If too thin, simmer for an extra minute. Do not freeze as texture may become grainy. Store leftovers in an airtight container in the fridge for up to 5 days.
- Prep Time: 1 minute
- Cook Time: 9 minutes
- Category: Dessert
- Cuisine: American
Nutrition
- Serving Size: Approximately 1/2 cu
- Calories: 220
- Sugar: 38
- Sodium: 50
- Fat: 6
- Saturated Fat: 4
- Carbohydrates: 48
- Fiber: 2
- Protein: 1
Keywords: small batch, canned apple pie filling, budget dessert, quick dessert, single serving, apple pie, easy recipe, stovetop dessert



