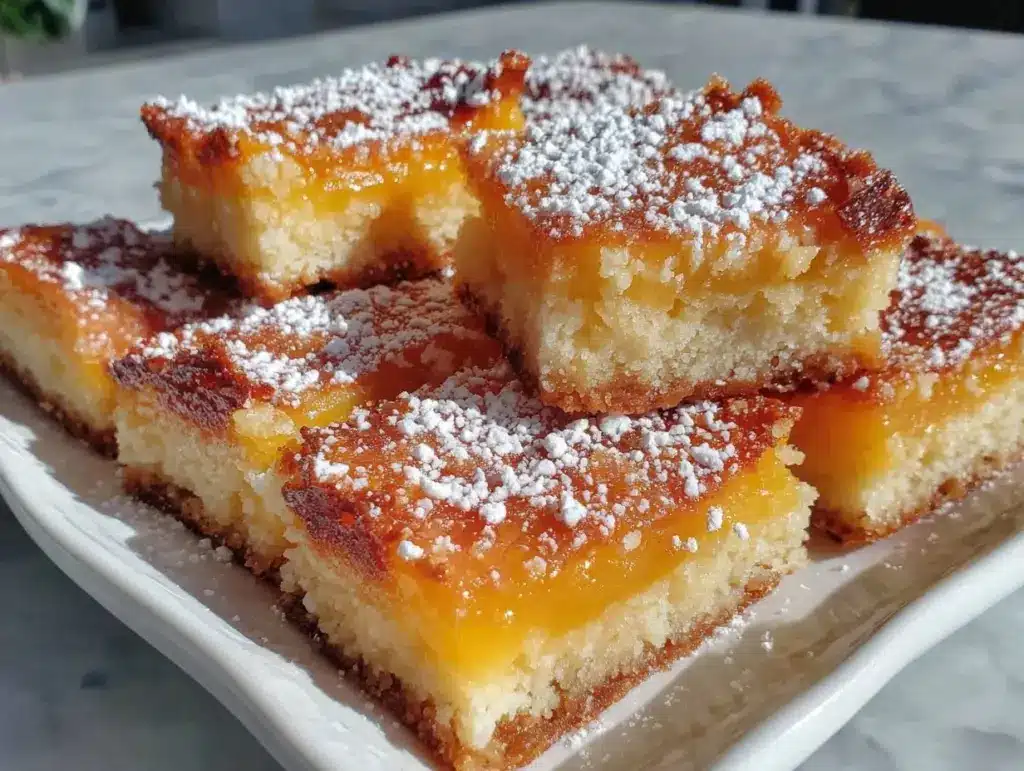
I still remember the exact moment I realized these lemon bars were going to be trouble. I brought a pan to a casual potluck in my neighborhood last summer. You know the type—plastic forks, lukewarm potato salad, and people standing around awkwardly holding paper plates. I set the pan down on the folding table, covered in that bright yellow dusting of powdered sugar, and walked away to grab a drink.
When I came back five minutes later, the pan was empty. Not a crumb left. Just a few sticky spots on the aluminum foil and a guy named Dave looking guilty while wiping his hands on his jeans. “I had to have another one,” he said, completely unapologetic. “The crust is insane.” And that’s when I knew. I had finally nailed the balance between tart and sweet, between crisp and chewy, in a way that actually works.
Most lemon bar recipes out there are either too sour (like biting into a raw lemon wedge) or too sweet (like eating a lemon-flavored sugar cube). Some have a crust that’s more cookie than shortbread, and others have a filling that never sets, resulting in a soupy mess on your plate. But these lemon bars with buttery shortbread crust? They are the gold standard. They are tangy, they are sweet, they have that perfect crumbly texture that makes you want to lick your fingers, and they are surprisingly easy to make even if you’ve never baked before.
I’ve tested this recipe at least a dozen times. I’ve tweaked the butter-to-flour ratio in the crust until it was just right. I’ve adjusted the egg-to-juice balance in the filling so it’s firm enough to cut into neat squares but soft enough to melt in your mouth. This isn’t just a recipe; it’s a confidence builder. If you’re looking for a dessert that looks fancy but is actually foolproof, stop scrolling. This is the one.
Why You’ll Love This Lemon Bar Recipe
There are a hundred reasons to bake these, but honestly, only three matter. These lemon bars with buttery shortbread crust are the ultimate dessert for anyone who wants to impress without spending all day in the kitchen. Here’s why they’ve taken over my oven:
Beginner-Proof Simplicity — Seriously, if you can mix a bowl, you can make this. There’s no fancy tempering of chocolate, no complex pie crust techniques where you have to keep your butter ice-cold (though cold butter helps, it’s not make-or-break here). It’s a one-bowl filling and a quick crust. I’ve made these while my toddler was climbing on my legs, and they turned out perfect every single time.
The Shortbread Crust Factor — This is the game-changer. Most lemon bars use a graham cracker crust. It’s fine, but it’s boring. This recipe uses a actual shortbread crust—buttery, slightly sandy, and crisp. It provides the perfect structural support for the juicy filling and adds a rich, savory contrast that makes the lemon pop. It’s the difference between a snack and a dessert.
Make-Ahead Magic — Unlike a soufflé or a meringue pie that needs to be eaten immediately, these bars actually improve after sitting in the fridge for a few hours. The flavors meld, the crust firms up, and the texture becomes even more consistent. I love making these the day before a gathering so I don’t have to stress on the day of. They keep well in the fridge for up to a week, though they usually disappear in two days.
Perfect for Any Occasion — Whether it’s a summer barbecue, a holiday cookie swap, or just a Tuesday night treat because you had a long day, these fit everywhere. They are elegant enough for a dinner party but casual enough for a picnic. Plus, they pair beautifully with a cup of hot tea or a glass of cold milk.
I’ve also made my share of other desserts, like these lemon lavender shortbread cookies, which are lovely but require more precision. These bars are the forgiving sibling of that recipe. You really can’t mess them up. The texture is consistent, the flavor is bright, and the result is always a hit.
Ingredients You’ll Need
Here’s the best part: you probably have most of these ingredients already. This isn’t a recipe that requires a trip to three different specialty stores. It relies on pantry staples and fresh lemons. Let’s break down what you need and why each item matters.
For the Buttery Shortbread Crust:
Unsalted Butter (1/2 cup / 113g) — Use real butter, not margarine. It needs to be softened but still cool. This gives the crust its rich, melt-in-your-mouth texture. If you use salted butter, reduce the added salt in the recipe slightly.
Confectioners’ Sugar (1/2 cup / 60g) — Also known as powdered sugar. This dissolves into the butter to create that sandy, shortbread texture. Don’t use granulated sugar here; it won’t incorporate properly and you’ll get gritty spots.
All-Purpose Flour (1 cup / 125g) — The base of the crust. Spoon it into the measuring cup and level it off. Don’t scoop directly from the bag, or you’ll pack too much flour and get a tough crust.
Salt (1/4 teaspoon) — Just a pinch to balance the sweetness and enhance the butter flavor.
For the Tangy Lemon Filling:
Fresh Lemons (3-4 medium) — I cannot stress this enough: use fresh lemons. Bottled lemon juice tastes metallic and flat. You’ll need about 1/2 cup of fresh juice. If your lemons are small, get four. If they are large, three might suffice. Roll them on the counter before juicing to get more juice out.
Granulated Sugar (1 cup / 200g) — This balances the tartness of the lemon. Don’t reduce this significantly, or the bars won’t set properly. The sugar helps the eggs coagulate.
All-Purpose Flour (1/3 cup / 40g) — Yes, more flour. This is the thickener for the filling. It ensures you get those clean cuts instead of a gooey mess.
Eggs (4 large) — Room temperature eggs mix more evenly into the filling. If you’re in a rush, just drop them in a bowl of warm water for 5 minutes.
Lemon Zest (1 tablespoon) — This is where the intense lemon flavor lives. The juice is sweet-tart, but the zest is aromatic and bright. Use the yellow part only, not the white pith, which is bitter.
Optional: Powdered Sugar (for dusting) — This isn’t just for looks. It adds a final layer of sweetness and makes the bars look bakery-fresh. Sift it over the cooled bars for a delicate snowfall effect.
Pro Tip on Zesting: Wash your lemons thoroughly before zesting. I use a microplane grater because it gets fine, fluffy zest that distributes evenly. A regular box grater works too, but you might get larger shreds of zest that can be a bit chewy.
Equipment Needed
You don’t need fancy gadgets for this. Here’s what I actually use, along with some alternatives if you’re missing something.
8×8 Inch Baking Pan — This is the standard size for these bars. Line it with parchment paper, leaving an overhang on the sides. This is crucial for lifting the whole batch out once it’s baked. You can use a 9×9 pan if you want thinner bars, but the baking time will be shorter.
Mixing Bowls — You’ll need two medium bowls. One for the crust, one for the filling.
Whisk — Essential for the filling. You need to beat the eggs and sugar until they are pale and fluffy. A fork won’t do this job well. A hand mixer is nice but not necessary; you can do it by arm.
Fork or Pastry Cutter — For mixing the crust. I just use a fork to cut the butter into the flour-sugar mixture. It’s fast and effective.
Zester or Grater — As mentioned, a microplane is best for getting that fine zest.
Cooling Rack — Let the bars cool completely before cutting. This is the hardest part, but rushing it leads to squished bars.
Knife — A sharp chef’s knife or a serrated knife works best for clean cuts. Wipe the blade between cuts for the neatest edges.
How to Make It: Step-by-Step
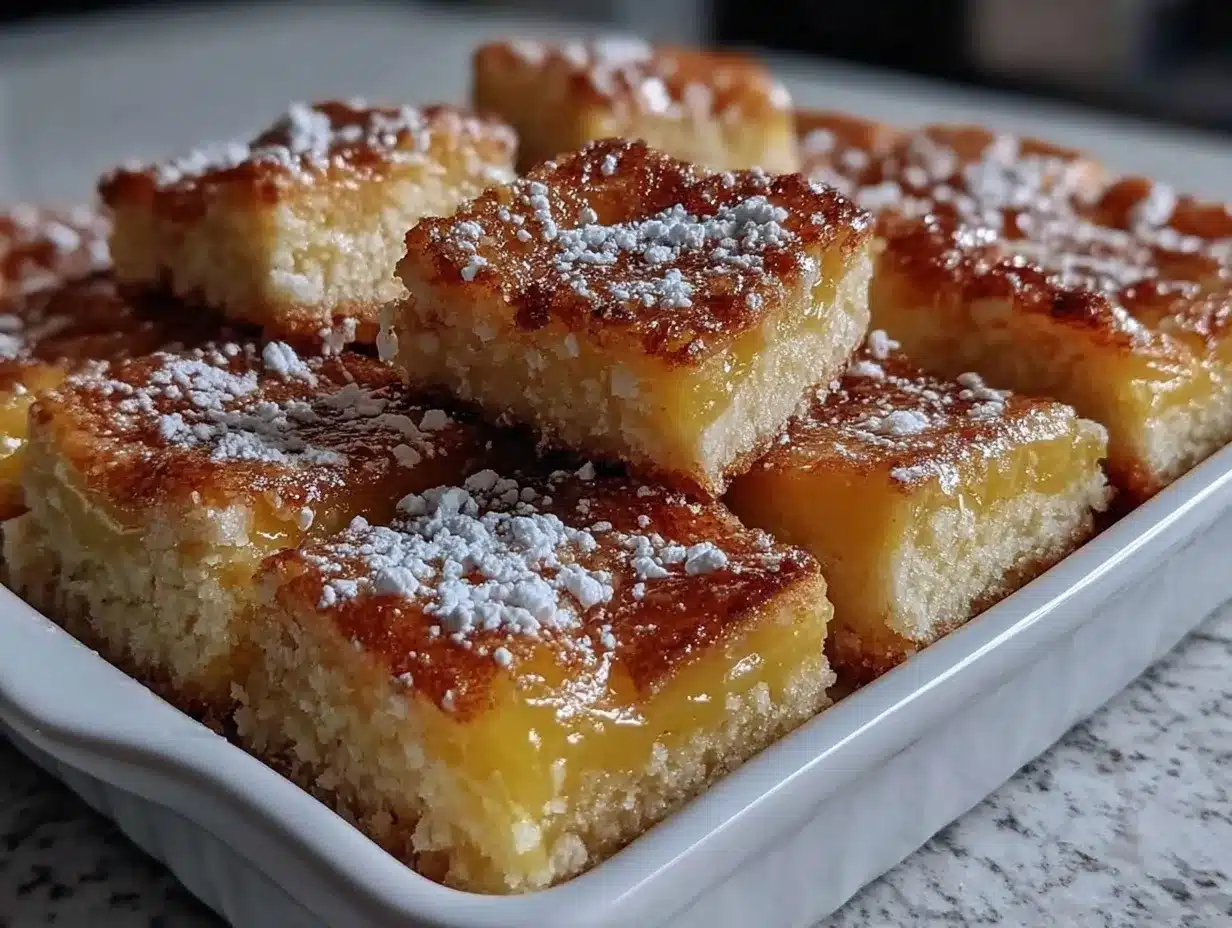
Alright, let’s make these lemon bars with buttery shortbread crust! I’m walking you through exactly how I do it, including the little tricks I’ve picked up over the years.
Step 1: Prep the Pan and Oven (5 minutes)
Preheat your oven to 350°F (175°C). Line your 8×8 inch baking pan with parchment paper. Leave a few inches of overhang on the long sides—this is your handle for lifting the bars out later. Lightly spray the parchment with non-stick spray or brush with a little butter. This ensures nothing sticks.
Step 2: Make the Shortbread Crust (5 minutes)
In a medium bowl, combine the softened butter, confectioners’ sugar, flour, and salt. Mix with a fork or your hands until it looks like coarse sand. It should hold together when you pinch it. If it’s too dry, add a teaspoon more of butter. If it’s too wet, add a teaspoon more flour.
Press this mixture firmly and evenly into the bottom of your prepared pan. Use the bottom of a measuring cup or your fingers to pack it down tight. An uneven crust leads to uneven baking. Don’t worry if it doesn’t look pretty; it’ll be covered up.
Step 3: Blind Bake the Crust (15-18 minutes)
Bake the crust for 15-18 minutes, or until the edges are lightly golden. It won’t brown much, but you’ll see the color deepen slightly. Remove from the oven and let it cool for 5 minutes. Leave the oven on.
Why blind bake? The filling is wet. If you put it on raw dough, the bottom will be soggy. Par-baking sets the structure so it stays crisp.
Step 4: Make the Lemon Filling (5 minutes)
While the crust cools, zest your lemons. Then juice them—you need 1/2 cup of fresh juice. In a large bowl, whisk the granulated sugar and the 1/3 cup flour until combined. This prevents lumps in the final filling.
Add the eggs one at a time, whisking well after each addition. Then add the lemon juice and zest. Whisk vigorously until the mixture is smooth, pale, and slightly thickened. It should look like a thin batter. Taste it—it should be very sweet and very tart. If it tastes bland, you didn’t use enough lemon.
Step 5: Assemble and Bake (20-25 minutes)
Pour the lemon filling over the warm crust. It might look like a lot, but it will set. Smooth the top with a spatula. Place the pan back in the oven and bake for 20-25 minutes.
How to tell it’s done: The edges should be set and slightly puffed. The center should still have a slight jiggle, like Jell-O, but not a liquid wave. It will firm up as it cools. If you see cracks forming on top, that’s normal. Don’t panic.
Step 6: Cool Completely (Crucial Step)
Remove from the oven and let the pan cool on a wire rack for at least 1 hour. Then, refrigerate for at least 2 hours, preferably overnight. This is non-negotiable. Warm lemon bars are messy and don’t cut cleanly. Cold lemon bars are perfect.
Step 7: Cut and Dust
Use the parchment overhang to lift the entire block of bars out of the pan. Place it on a cutting board. Use a sharp knife to cut into squares. Dust generously with powdered sugar using a fine-mesh sieve. Serve and enjoy.
Expert Tips & Tricks
Here’s everything I’ve learned from making this dozens of times. These tips will save you from my mistakes.
Room Temperature Eggs — Cold eggs can cause the filling to curdle slightly when mixed. Let them sit out for 30 minutes before you start. It makes the texture smoother.
Don’t Skip the Zest — The juice provides the acidity, but the zest provides the aroma. Without zest, it just tastes like lemonade. With zest, it tastes like fresh lemons.
The Jiggle Test — Many people overbake lemon bars because they wait for the center to be completely firm. It won’t be. It should jiggle slightly in the center when you pull it out. Residual heat will finish the cooking.
Sharp Knife Only — A dull knife will smash the bars. Dip your knife in hot water and wipe it dry between each cut for pristine squares. This is a pro baker secret.
Storage — Keep them in an airtight container in the fridge. They last up to 5 days. Do not freeze them; the texture of the shortbread crust changes when frozen and thawed, becoming soggy.
I also love using these techniques in other desserts. For example, the way we handle the crust here is similar to the method used in my classic banana cream pie, where a pre-baked base ensures a crisp contrast to the creamy filling.
Variations & Substitutions
Once you’ve nailed the basic version, here’s how you can mix it up. I’ve tried all of these, and they all work.
Lemon Blueberry Bars — Sprinkle 1 cup of fresh or frozen blueberries over the crust before pouring the filling. The berries burst and create beautiful purple swirls. Just be aware they might add a little extra moisture, so bake for an extra 2 minutes.
Lemon Raspberry Swirl — After pouring the filling, drop spoonfuls of raspberry jam on top and swirl with a knife. It adds a gorgeous marbled effect and a tart-sweet complexity.
Coconut Lemon — Add 1/2 cup of shredded coconut to the crust mixture. It adds a tropical twist that pairs amazingly with the lemon. You could also add 1 teaspoon of coconut extract to the filling.
Gluten-Free Option — Use a 1:1 gluten-free flour blend for both the crust and the filling. The texture might be slightly more tender, but it works perfectly. I’ve used Bob’s Red Mill with great results.
Vegan Version — This is trickier because the eggs are the binder. You can try using a flax egg (4 tablespoons ground flax + 12 tablespoons water) and cornstarch instead of flour, but the texture will be more like a custard than a bar. For a truly vegan version, I recommend checking out my lemon raspberry cheesecake bars, which are naturally vegan and use cashews for that rich, creamy texture.
Serving & Storage
How to Serve: I usually serve these straight from the fridge. They are best cold. Pair them with a strong black coffee or a cup of Earl Grey tea. The bitterness of the tea cuts through the sweetness perfectly. I also like to serve them with a dollop of whipped cream for those who want it extra rich.
Side Dishes: These bars are rich, so they don’t need much else. A simple green salad with a vinaigrette is a nice light contrast if you’re serving them as part of a larger meal.
Storage Instructions: Store in an airtight container in the refrigerator for up to 5 days. If you stack them, put parchment paper between the layers to prevent sticking. Do not leave them at room temperature for more than 2 hours, as the eggs in the filling can spoil.
Freezing: I don’t recommend freezing these. The high moisture content in the filling and the butter in the crust can lead to texture issues upon thawing. They are best fresh.
Nutrition Information
I’m not a nutritionist, but here’s the breakdown if you’re tracking. Keep in mind that this is a dessert, so it’s calorie-dense.
Per Serving (based on 16 bars):
– Calories: 180
– Protein: 2g
– Carbs: 24g
– Fiber: 0g
– Sugar: 18g
– Fat: 9g
– Saturated Fat: 5g
– Cholesterol: 45mg
– Sodium: 90mg
What’s Good: It’s a relatively small serving size, so you can indulge without overdoing it. The shortbread crust provides some satisfaction, so you don’t feel like you’re just eating sugar.
What to Know: It’s high in sugar and saturated fat due to the butter and sugar content. If you’re watching your intake, one square is plenty. Pair it with unsweetened tea or coffee.
My Take: Look, this is a treat. It’s meant to be enjoyed. Don’t stress about the calories. The joy of baking and sharing these bars is worth the few extra calories. Plus, they are homemade, so you know exactly what’s in them—no preservatives or artificial flavors.
Final Thoughts
So that’s my go-to lemon bars with buttery shortbread crust! I’ve probably talked your ear off at this point, but when you make a recipe this often, you have a lot to say about it.
This recipe has saved me more times than I can count. It’s my answer to “what dessert should I bring?” when I’m short on time but want to look like I spent hours in the kitchen. My friends are obsessed, my family begs for them, and I’m just happy that it’s so easy to make.
Make it yours! Try different toppings like crushed pistachios or fresh mint leaves. Adjust the lemon juice to your taste—if you love it sour, add an extra tablespoon. The best recipes are the ones you adapt to your own preferences.
If you make these, drop a comment and let me know how they turned out! I love hearing from you. And if something doesn’t work, tell me that too—I’m here to help troubleshoot. Happy baking!
Frequently Asked Questions
Can I use bottled lemon juice?
You can, but I strongly advise against it. Bottled lemon juice often contains preservatives that give it a metallic, flat taste. Fresh lemons provide the bright, aromatic zest and the clean acidity that makes these bars taste amazing. If you absolutely must use bottled juice, choose one that is 100% pure and pasteurized, but add extra zest to compensate for the lack of aroma.
Why did my lemon bars turn out gooey?
This usually happens for one of two reasons: either the bars weren’t baked long enough, or they weren’t cooled long enough. The center should have a slight jiggle when you take it out of the oven. If it’s still liquid, bake for another 5 minutes. Also, remember that the bars continue to cook as they cool. If you cut into them while they’re warm, they will fall apart. Patience is key!
Can I make these ahead of time?
Absolutely. In fact, they taste better the next day. Make them up to 2 days in advance. Store them in the fridge in an airtight container. If you want to prepare them 3-4 days ahead, just make sure to dust them with powdered sugar right before serving, as it will dissolve into the crust if done too early.
How do I get clean cuts?
The secret is a sharp knife and hot water. Dip your knife in hot water, wipe it dry with a paper towel, and make your cut. Repeat this process for every single square. This prevents the knife from sticking to the sticky filling and ensures clean, professional-looking edges.
Can I double this recipe?
Yes, but you’ll need a 9×13 inch pan. Double all the ingredients. The baking time might need to be adjusted slightly—check them 5 minutes earlier than the original recipe to avoid overbaking. The filling depth will be slightly less, so it might set a bit faster.
What if I don’t have a microplane?
Use a box grater! Just be careful to use the smallest holes to get fine zest. You can also use a vegetable peeler to remove strips of zest, then finely chop them with a knife. The key is to minimize the white pith, which is bitter.
Pin This Recipe!


Lemon Bars: Easy, Beginner-Proof Shortbread Dessert
- Total Time: 55 minutes
- Yield: 16 servings 1x
Description
These lemon bars feature a buttery shortbread crust and a tangy, sweet filling that is foolproof for beginners. They are easy to make, improve with chilling, and offer the perfect balance of tart and sweet.
Ingredients
- 1/2 cup unsalted butter, softened
- 1/2 cup confectioners’ sugar
- 1 cup all-purpose flour
- 1/4 teaspoon salt
- 1 cup granulated sugar
- 1/3 cup all-purpose flour
- 4 large eggs, room temperature
- 1/2 cup fresh lemon juice (from 3–4 medium lemons)
- 1 tablespoon lemon zest
- Powdered sugar, for dusting
Instructions
- Preheat oven to 350°F (175°C). Line an 8×8 inch baking pan with parchment paper, leaving an overhang on the sides, and lightly grease.
- In a medium bowl, combine softened butter, confectioners’ sugar, 1 cup flour, and salt. Mix until it resembles coarse sand.
- Press the crust mixture firmly and evenly into the bottom of the prepared pan.
- Blind bake the crust for 15-18 minutes until edges are lightly golden. Remove and let cool for 5 minutes.
- While the crust cools, whisk granulated sugar and 1/3 cup flour in a large bowl to prevent lumps.
- Add eggs one at a time, whisking well after each addition. Whisk in lemon juice and zest until smooth and pale.
- Pour the filling over the warm crust and smooth the top.
- Bake for 20-25 minutes until edges are set and the center has a slight jiggle.
- Cool completely in the pan on a wire rack for at least 1 hour.
- Refrigerate for at least 2 hours (preferably overnight) to set.
- Lift bars out using parchment overhang, cut into squares, and dust with powdered sugar before serving.
Notes
Use fresh lemons for best flavor; bottled juice tastes metallic. Room temperature eggs help prevent curdling. The bars must be chilled completely to cut cleanly. Do not freeze as the texture may become soggy. For clean cuts, dip knife in hot water and wipe dry between cuts.
- Prep Time: 15 minutes
- Cook Time: 40 minutes
- Category: Dessert
- Cuisine: American
Nutrition
- Serving Size: 1 bar
- Calories: 180
- Sugar: 18
- Sodium: 90
- Fat: 9
- Saturated Fat: 5
- Carbohydrates: 24
- Protein: 2
Keywords: lemon bars, shortbread crust, beginner baking, easy dessert, citrus bars, make-ahead dessert